What it is and how to choose
What Are Fiberglass Stair Tread Covers? How to Choose
A fiberglass stair tread cover is a finished FRP walking surface fixed over an existing step. The old step remains structural. Choose the cover by checking the substrate, cover-versus-replacement route, dimensions, fixing, surface and nosing as one assembly.

A patterned FRP walking surface. Cover format, backing and fixing are confirmed for the stair. Photo: Dengtai Industry.
What it is
What Is a Fiberglass Stair Tread Cover?
It is a surface that renews an existing step while the step underneath remains the structural member.
- Fiberglass stair tread cover
- A relatively thin FRP walking surface fixed over an existing stair tread. It improves or renews the walking surface; the existing step remains responsible for carrying the stair load.
- Load-bearing stair tread
- A complete molded, pultruded or covered grating tread that spans between stair supports. Use the separate stair-tread page when the old tread, stringer connection or support cannot stay in service.
- Existing substrate
- The steel, concrete, timber or FRP step that receives the cover. Its strength, flatness, moisture condition and ability to hold the proposed fixing are part of the product decision.
- Tread depth
- The front-to-back walking distance from the rear edge to the front nosing. It is not the stair width and not the cover panel thickness.
- Stair width or cover length
- The dimension across the stair that the cover has to fit. Confirm whether the project measures between stringers, between finished walls or to another datum.
- Nosing
- The front edge people approach when climbing. A cover may end at the existing edge, form a small projection or include a contrasting front band; the chosen detail has to be dimensioned.
- Cover fixing
- Adhesive, mechanical fasteners or another agreed method used to retain the cover. The fixing must suit the substrate; it does not restore a corroded, loose or missing structural step.
First decision
Is Your Stair Suitable for a Fiberglass Tread Cover?
Start with the existing structure. A cover is appropriate only while the old step can remain in service.
Specify this if…
- The existing steel, concrete or timber step has been inspected and remains structurally suitable for continued service.
- The main need is to renew grip, appearance or the walking surface without changing the stair structure.
- The finished cover thickness, nosing projection and side clearances can fit the existing risers, landings and surrounding construction.
- Every proposed fixing lands in a suitable substrate, and the required adhesive, mechanical fixing or combined system can be installed and inspected.
- The project can provide measured stair dimensions, substrate photographs and a clear nosing direction for a custom piece schedule.
Look elsewhere if…
- The old tread is corroded, cracked, loose, rotting or supported by a stringer that is no longer adequate.
- The project expects the cover to increase the structural load capacity or repair missing bearing.
- An open grating tread has no checked backing or support for the cover; a complete covered grating tread needs to be compared instead.
- The added cover height or nosing projection would interfere with risers, doors, landings or a safe stair transition.
- The substrate condition, fixing method or finished geometry is still unknown and cannot be inspected before fabrication.
Scope decision
Retrofit Fiberglass Cover or New Stair Tread?
A cover is appropriate only while the existing step remains a suitable structural support.
Swipe horizontally to view all columns.
| Decision | Retrofit fiberglass cover | Complete replacement tread |
|---|---|---|
| Structural role | The existing steel, concrete or timber step remains in service and carries the stair load. | The new grating tread spans between the stair supports and becomes the structural walking member. |
| First check | Is the old step sound, fixed, reasonably flat and able to accept the chosen adhesive or fastener? | What are the actual supports, clear span, end bearing, stair width and required load and deflection? |
| Fit dimensions | Cover length, tread depth, nosing projection, edge clearances, cover thickness and fixing positions. | Tread depth, span, bearing direction, nosing, end treatment, fixings and complete assembly thickness. |
| Existing grating | A loose cover over open grating needs a checked backing or support arrangement; an unsupported plate is not an automatic solution. | A new covered grating tread combines a confirmed structural base with the selected cover. |
| Typical reason to choose | The old step is suitable but worn, slippery, visually poor or difficult to clean. | The old tread is corroded, loose, cracked, missing support or cannot demonstrate the required structural condition. |
Substrate review
Fiberglass Stair Cover by Existing Step Type
The same cover can require a different preparation, fixing and edge detail on steel, concrete, timber or grating.
Swipe horizontally to view all columns.
| Existing step | Checks before a cover | What the fixing plan must resolve |
|---|---|---|
| Steel stair or checker plate | Rust, loose paint, distortion, plate thickness, fixing access and contact over high points. | Clean and prepare the steel; confirm whether mechanical fasteners or another agreed method can be used without weakening the step. |
| Concrete step | Cracks, spalling, loose topping, moisture, flatness, edge condition and anchor suitability. | Choose a compatible preparation and fixing method; confirm adhesive or anchors for the actual cover and substrate. |
| Timber step | Rot, splitting, movement, moisture, board gaps and screw pull-out at each fixing location. | Check that every fixing lands in sound timber and that the cover does not trap moisture or create a loose edge. |
| Existing FRP grating tread | The open grid does not provide continuous support to a thin cover by itself. | Confirm a suitable base/backing or switch to a complete covered grating tread rather than laying an unsupported plate over the mesh. |
| Uneven or worn step | Local high points, lips, missing material or a nosing that no longer forms a sound edge. | Repair or replace the substrate before covering it. A flexible cover following a poor surface can leave gaps or fixings under strain. |
Surface and nosing
How to Choose a Stair Cover Surface and Nosing
Select the walking surface and front-edge detail after the substrate and fixing method are understood.

Gritted fiberglass cover
A gritted flat FRP format for stairs where a rough contact surface is wanted. Grit can improve texture underfoot but is not a slip class unless the actual product has the required test and result.
Patterned FRP cover
A patterned flat format such as a raised diamond or flower surface. It gives a defined walking texture and can suit visible or lightly contaminated access areas where a continuous top is preferred.

Contrasting nosing detail
A clearly identified front edge can improve stair visibility. Show the nosing location, projection, band width, color and whether the profile is formed into the cover or added as a separate detail.
Drawing fields
Fiberglass Stair Tread Cover Dimensions
These are the dimensions and construction fields needed to define a custom cover without confusing width, depth and thickness.
Request a Project Quote| Specification | Value |
|---|---|
| Substrate | Steel, concrete, timber or suitable FRP Record material, condition, moisture or corrosion and the available fixing locations. |
| Cover length | Finished stair-width dimension State the measurement datum and any side clearances or wall gaps. |
| Tread depth | Rear edge to front nosing Show the existing step depth, the required cover depth and any front or rear projection separately. |
| Cover construction | Patterned or gritted FRP Confirm cover thickness, backing or assembly and available resin and color. |
| Nosing detail | Location, width and projection Identify one or both edges, contrasting color and whether the nosing is formed or applied. |
| Fixing | Adhesive, mechanical or agreed system Provide hole coordinates, substrate material and edge distances; confirm included fasteners. |
| Quantity and marks | Piece list by stair and level Mark different widths, nosing directions and openings so matching-looking pieces cannot be swapped. |
How to Choose a Fiberglass Stair Tread Cover
Start by proving that the existing step can stay in service. Then turn the actual stair dimensions, substrate and fixing condition into a cover specification. The choice is not complete until the surface, nosing, finished height and piece list have been checked together.
The cover assembly normally includes the FRP walking layer, a grit or patterned contact surface and a defined front-edge or fixing detail. The selected resin and laminate should suit the indoor or outdoor exposure. The exact thickness, backing and fastening arrangement are confirmed for the real stair because those choices affect fit and installation.
This page is deliberately separate from our complete fiberglass stair tread guide. That page covers molded, pultruded and covered grating treads that span between stair supports. Here, the existing step stays in service and the cover changes the walking face.
For a side-by-side route check, use load-bearing stair treads versus retrofit covers. It starts with the same structural question and keeps the finished stair geometry, fixing and quoted scope visible.
Step 1: Confirm the Existing Stair Is Suitable
A cover is worth comparing when:
- the existing stair structure has been checked and remains suitable;
- the current surface is worn, slippery, difficult to clean or visually poor;
- a new walking texture or contrasting nosing is needed;
- the added cover height and nosing projection fit the stair geometry;
- the substrate can be prepared and accept the agreed fixing; and
- the project wants to avoid replacing sound treads and supports.
It is not the right starting point when the old tread has lost its section, the stringer connection is loose, the concrete is breaking up, the timber is rotten, openings cannot carry a cover or there is no clear support under a grating tread. Those conditions need repair or a complete replacement tread.
This is the first point where a manufacturer can stop a poor order. A photograph showing an attractive new surface does not establish that the substrate underneath can carry people, hold fasteners or remain stable. Ask who inspected the old stair and record that decision with the inquiry.
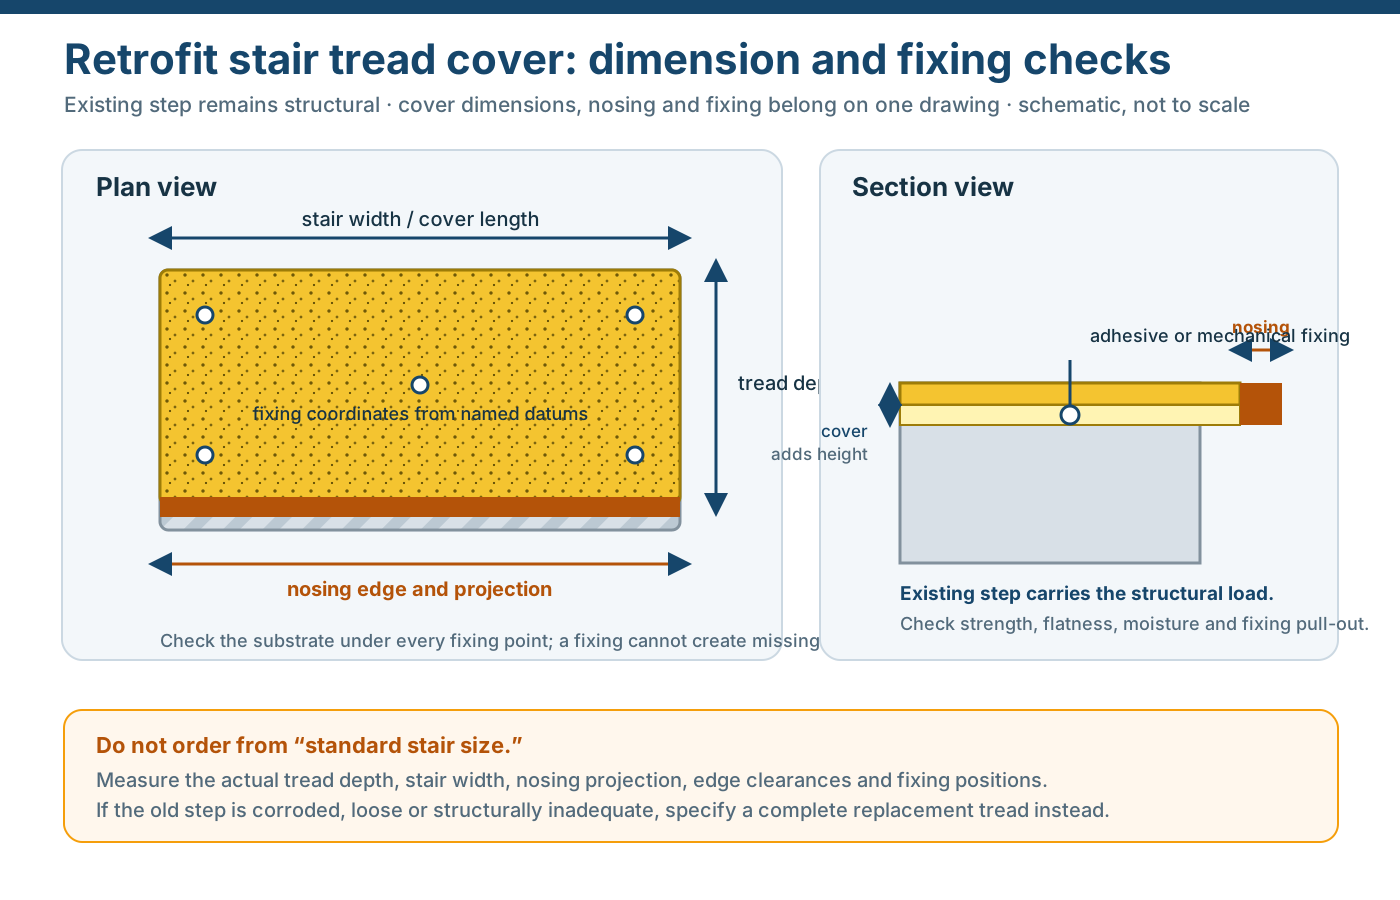
Step 2: Measure the Existing Step
The finished cover starts with the stair as built. Measure every different tread, including the first and last, because landings and changes in width often produce special pieces. Record the cover length across the stair and the tread depth from the rear edge to the front nosing.
Use the stair landing layout guide when the final cover tread meets the landing, stair stringer, guardrail posts or a transition panel. The cover height and nosing projection belong to that complete stair interface.
Use the dedicated FRP stair tread measurement guide when the stair has varying widths, irregular edges, different support conditions or multiple piece marks. It separates stair width from support span, tread depth from going and finished cover thickness from the existing step.
The word “width” is used inconsistently in stair catalogues. Some products call the front-to-back walking dimension “tread width” and the dimension across the stair “length.” Our drawings name each edge and keep these fields separate:
| Field | What it describes |
|---|---|
| Cover length / stair width | Dimension across the stair, with the measurement datum stated |
| Tread depth | Front-to-back walking dimension of the cover |
| Cover thickness | Vertical build-up added above the old step |
| Nosing projection | How far the front edge extends beyond the existing support or riser |
| Side clearance | Finished gap or contact at walls, stringers or adjacent trim |
| Fixing coordinates | Hole or anchor positions measured from named edges |
| Quantity and mark | Number of pieces and their stair, level or position |
Check the cover on the stair before drilling where practical. A cover that fits the outline may still interfere with a door, landing, handrail post, stringer or the next riser. The added height and nosing projection are part of the finished stair, not just the product thickness.
What about standard cover thickness and sizes?
Catalogues describe stair-cover thickness and depth in different ways, and one supplier’s standard size is not a cross-manufacturer specification. Ask for the actual finished thickness, tread depth, weight and fixing arrangement of the proposed piece. Do not select a thickness from another catalogue and assume the stair height, substrate or fixing detail will remain suitable.
Step 3: Match the Cover and Fixing to the Substrate
The substrate decides how the cover is prepared and fixed. It can also rule out a cover. This section is the survey checklist we use to separate a sound step from one that still needs repair or a complete replacement tread.
The first question is not “adhesive or screws?” It is whether the existing step remains structurally suitable and whether every proposed fixing lands in material that can carry it. A clean cover photograph cannot answer either question.

Steel stairs and checker plate
For steel, inspect:
- loose coating, oil, mill scale and contamination;
- rust, pitting and actual section loss;
- distortion, dents, sharp high points and loose plates;
- condition of welds and stringer connections;
- sound metal at every proposed fastener;
- movement or local flex under traffic that the cover and fixing must follow;
- whether a raised checker pattern prevents the cover from seating;
- access for drilling, fastening, inspection and cleaning.
Surface corrosion is not automatically a reason to reject the step, and a clean paint layer is not automatically proof of sound metal. The project should establish who inspected the structure and whether any repair is required before covering it.
Preparation and fixing must match the steel detail. Mechanical fixing can be easier to inspect than a bonded cover, but it also requires sound metal, suitable edge distance and access. An adhesive bond needs a compatible preparation and environment; it does not replace metal section lost to corrosion.
A steel stair may flex or move under traffic rather than behave as a perfectly rigid base. The cover’s own stiffness, bearing contact and fixing layout therefore have to suit the actual stair. Do not assume that a rigid cover can be pulled down to a moving steel tread by tightening a few fasteners.
Concrete stairs
For concrete, inspect:
- cracks, spalling and exposed reinforcement;
- hollow toppings or delaminated repair material;
- dampness, staining and evidence of water movement;
- level and flatness across the tread;
- sound material at anchors or adhesive areas;
- condition of the front edge, riser and landing transition;
- access for dust control and preparation.
Painting over a crack or bonding a cover over a hollow patch does not repair the concrete. The substrate should be assessed and repaired as required before a cover is quoted.
The fixing method also has to suit the concrete condition. An anchor needs a sound base and appropriate hole preparation; an adhesive system needs compatible moisture and surface conditions. The cover drawing should say which preparation and fixing method have been approved, not leave the choice to a site fitter.
Timber stairs
For timber, inspect:
- rot, softness and insect damage;
- splits, loose boards and previous repairs;
- board gaps that affect support or moisture;
- movement under foot and loose stair connections;
- moisture at the tread, nosing and side edges;
- sound timber at every screw or fixing point;
- how the finished cover will be cleaned and inspected.
A cover can trap moisture at its edges. The finished detail should provide a practical inspection and cleaning path, or the project should confirm that the timber and environment are suitable for the selected attachment.
Each fixing must land in sound timber. A screw that enters a gap or rotted patch is not made reliable by tightening it or adding adhesive around the head. Where timber condition is uncertain, repair or replacement comes before cover selection.
For the substrate-specific survey records behind these checks, continue with the concrete stair cover survey, the steel stair retrofit inspection or the timber moisture and fixing inputs.
Existing FRP grating treads
An open grating tread does not provide continuous support for a thin cover plate. A loose plate laid over the mesh can rock, wear or crack at the openings unless a checked backing or support arrangement is designed. Where that support is not available, a complete covered grating tread is the clearer product.
Check the existing FRP for cracks, delamination, movement, UV damage and unsupported cut edges. Confirm whether the existing tread is load-bearing and whether the proposed cover is part of a new structural assembly or only a surface layer on a proven base.
Uneven, corroded or patched steps
Repair or replace the substrate first. A flexible cover can follow some minor variation, but it cannot correct a missing edge, a loose plate or a worn support. Fasteners should not be used to pull a distorted cover down onto a poor surface.
The same rule applies to a separate nosing profile. A strip can follow a small irregularity, but it cannot restore a broken concrete edge, a corroded steel lip or a rotted timber nose. The separate or integral GRP nosing guide explains how to keep the front-edge product separate from the structural repair question.
Check movement, fastener compatibility and application conditions
The survey is not complete when it names the substrate. It also has to establish how the cover and fixings will behave with that substrate:
- whether the stair deflects or moves under traffic;
- whether FRP, steel, concrete and timber move differently at temperature or moisture changes;
- whether the approved detail needs a flexible adhesive, a movement allowance or another product-specific connection;
- whether the fastener material is suitable for the indoor, outdoor, coastal or chemical exposure;
- whether dissimilar materials need separation to avoid galvanic or other compatibility problems;
- whether every drilled or anchored hole will be sealed against water entry;
- whether ambient and substrate temperature, moisture and ventilation meet the adhesive or coating method.
These points do not prescribe one universal fixing. They identify what the actual product method must answer. Dense fixing at short notice is not a substitute for compatible movement, and a bonded cover should not be pulled into place over gaps by tightening its perimeter.
Record the same survey fields for every substrate
Use one common table so that different stairs can be compared without losing the reason for a fixing choice:
| Survey field | Steel | Concrete | Timber |
|---|---|---|---|
| Primary condition | corrosion and loose coating | cracks, spalling and moisture | rot, splits and movement |
| Contact check | high points and distortion | level, hollow areas and edge | board soundness and gaps |
| Fixing basis | sound metal and edge access | compatible anchors or adhesive | sound timber at each fastener |
| Movement check | stair flex and connections | repair condition and moisture | board movement and ventilation |
| Material contact | fastener and steel condition | anchor and adhesive chemistry | fixing and moisture compatibility |
| Preparation | approved steel preparation | approved concrete preparation | dry, sound and clean timber |
| Installation | access, temperature, sealing | moisture, dust and cure | dryness, temperature and access |
| Water / cleaning | edges and trapped debris | moisture and drainage | trapped moisture and gaps |
| Stop condition | section loss or loose plate | failed edge or unsound topping | rot or unreliable fixing |
| Record required | inspector and repair status | inspector and repair status | inspector and repair status |
The record should also carry the stair/level, piece mark, measured geometry, cover construction, nosing detail, fixing coordinates, current revision and any required document. If the survey sheet and the cover drawing disagree, the quotation should stop until the revision is reconciled.
Step 4: Choose Grit, Pattern and Nosing
The walking surface and the substrate are separate choices. A gritted cover can provide a rougher texture for wet or contaminated routes. A patterned cover can give a more defined raised pattern and a continuous appearance. Neither format is automatically a slip class.
Where slip performance is a requirement, state the test method, wet or dry condition, footwear or barefoot use and acceptance value. A sample helps compare texture by touch, but a visual sample does not prove a numerical result.
A contrasting nosing helps people identify the front edge. Show whether the nosing is formed into the cover, added as a separate profile or created by a different color. Confirm its width and projection; a painted stripe on a separate part is not the same detail as a formed front edge. The stair tread nosing and end-detail guide expands this into plan, section and support views.
If the project is still deciding between a formed return, an applied profile and a visibility band, use the separate versus integral GRP nosing guide before approving the cover edge.
Use the FRP surface guide for grit, pattern and color comparison. The surface choice does not change the cover’s structural limitation.
Step 5: Check the Finished Stair Geometry
A cover changes the stair in ways that are easy to underestimate:
- Each tread becomes higher by the finished cover thickness.
- The nosing can move forward.
- The transition at the top landing and bottom step can change.
- The cover adds mass and another edge to clean.
- Water or debris may behave differently at the sides and joints.
- A mechanically fixed cover adds holes or fasteners to inspect.
- A bonded cover depends on correct substrate preparation.
Bring the stair survey and the finished cover section together. If the height or projection is unacceptable, a thinner cover may not be suitable for the substrate, and a different repair or replacement detail may be needed.
Use the stair cover finished-height guide to record the actual dry-fit and post-installation levels, joints and both landing transitions.
Step 6: Prepare a Controlled Cover Piece List
Stair covers are normally made to the approved dimensions rather than selected from one universal stock size. A usable schedule gives every different cover a mark and states:
- stair or level and installation position;
- cover length and tread depth;
- substrate type;
- cover format, colour and thickness;
- nosing edge, width, projection and contrast;
- fixing method and hole coordinates;
- edge treatment and any required removable detail; and
- quantity and drawing revision.
Two pieces with the same outline may have different nosing directions, fixing positions or substrate details. The mark must follow from drawing to inspection and packing.
The cutting and edge-sealing guide covers finished edges and fabrication. Where the cover uses fasteners rather than adhesive, review the clip and fixing guidance and confirm the actual fastener scope in the quotation.
When the stair includes mixed treads, covers and accessories, use the mixed stair quotation-list guide so each piece and fixing group remains visible.
The Manufacturer View: Protect the Stair Before Covering It
The most useful first photograph is not of a clean product sample. It is a photograph of the existing stair, with the fixing points and damaged areas visible. A photograph of a cover on a showroom floor cannot answer whether the old step is sound or whether the nosing will fit the building.
Our review asks three plain questions:
- What remains structural after the cover is installed?
- Can the cover be prepared and fixed without hiding a defect?
- What will people, doors and maintenance teams meet at the finished edges?
When the answers are not clear, the safe next step is to repair the substrate or review a complete load-bearing tread. A cover is a practical upgrade for a sound stair, not a shortcut around structural work.
Factory review
What We Check Before Quoting a Stair Tread Cover
The quotation links the substrate, walking surface, finished geometry and fabrication scope.
Patterned and grit formats are in our covered range
The factory works with patterned and grit flat formats. The final cover thickness, backing, color and assembly are confirmed for the stair rather than assumed from another panel.
Review covered FRP configurationsThe stair drawing controls fabrication
We use the finished cover dimensions, nosing direction and fixing coordinates from the current drawing. A generic “standard 10-inch cover” is not treated as the stair specification.
Review documentation expectationsA cover is not a structural repair
Corrosion, cracks, movement or unsupported grating have to be resolved before a cover is offered. Where the stair itself is inadequate, we route the project to a complete load-bearing tread review.
Compare complete load-bearing stair treadsFactory cutting and edge treatment are part of the scope
Finished lengths, drilled fixing positions and edge treatment can be coordinated with the cover order when the drawing defines them.
Review cutting and edge-sealing scopeProject boundaries
What a Fiberglass Stair Cover Cannot Fix
Resolve structural and substrate problems before treating the visible surface.
- Confirm the old step remains structural — A cover renews the walking surface. It does not rebuild a rusted stringer, replace missing concrete, stiffen a loose tread or create the stair's design load. Record who has checked the existing structure.
- Give the substrate and its condition — State steel, concrete, timber or FRP; describe rust, cracks, moisture, movement, previous coatings, high points and fixing access. Photographs supplement a measured sketch but do not replace dimensions.
- Separate width, depth and thickness — Use stair width or cover length for the dimension across the stair, tread depth for the front-to-back walk dimension and cover thickness for the vertical build-up. Do not reduce them to one “size.”
- Define the nosing and finished edge — Show the front edge location, projection, band width and color. Check how the cover terminates at side walls, stringers, landings and risers so the finished edge is not left to site judgment.
- Check the finished stair geometry — A cover adds height at the tread and may project at the nose. Review riser consistency, landing transition, door clearance, drainage and anything that could create a new trip or fitting problem.
- Specify the fixing and acceptance criteria — Confirm adhesive or mechanical fixing for the real substrate, whether fasteners are supplied, required edge distances and any slip, fire, static or documentation requirement with the test method stated.
Survey sequence
From Existing Stair Survey to Cover Installation
Measure and inspect the actual stair, then keep the finished cover, nosing and fixing positions tied to one drawing.
Record tread depth, stair width, cover length, nosing direction, edge clearances and fixing positions for each different piece.
Show corrosion, cracks, spalling, timber rot, old coating, open grating and existing fixings. Mark anything that needs repair before covering.
Compare grit and patterned formats against footwear, contamination, cleaning and the required nosing visibility. State any slip-test requirement separately.
Agree adhesive, mechanical fastening or another method for steel, concrete or timber. Resolve who supplies the fasteners and who accepts the substrate condition.
Check cover height, nosing projection, riser consistency, side gaps, transitions and removability before releasing the piece list.
Dry-fit marked pieces, keep the approved revision and inspect fixings, edges and surface damage after installation. Replacement pieces should use the same recorded detail.
Request a quote
Send Your Fiberglass Stair Cover Measurements
Attach stair photos, dimensions and the substrate description. Mark the nosing edge and any repair or height concern.
- We check whether a cover or complete replacement tread fits the existing structure
- Tread depth, stair width, nosing and fixing positions are reviewed together
- Attach marked photos or a stair schedule; missing values can be confirmed
Fiberglass Stair Tread Cover FAQs
What is a fiberglass stair tread cover?
Can covers be supplied for concrete, steel and wood stairs?
Can I fit a cover directly over existing fiberglass grating?
How do I measure a stair tread cover?
What thickness should a fiberglass stair tread cover be?
Will a stair cover change the height of each step?
Should the cover be bonded or mechanically fixed?
What fixing checks are needed on steel, concrete and timber steps?
Does a gritted cover guarantee slip resistance?
Can covers be made to a custom length and depth?
When should I choose a complete stair tread instead?
This content was prepared and reviewed by Dengtai Industry’s technical and production team using the project conditions, available product data and applicable documents. Limits that require design, testing or approval are identified in the content. Content last checked: