Fiberglass stair tread inspection
Inspecting Grit Surfaces and Nosing on Fiberglass Stair Treads
Record contamination, grit wear, colour change, nosing lift, fixing problems and structural damage separately. Then give each finding a clear clean, monitor, repair, replace or stop action.
Prepared by
Dengtai Industry
Published
·
Reviewed

A complete flight view establishes location; close-ups must support a specific finding and action. Photo: Dengtai Industry.
Inspection vocabulary
Surface Wear, Nosing Damage and Structural Defects Are Different
Use condition terms that lead to the correct action rather than one generic “failed” label.
- Contamination
- Material on the tread that can reduce grip or imitate wear, such as oil, mud, salt, chemical residue, dust or cleaning product.
- Grit wear
- Loss, flattening, polishing or detachment of the walking-surface particles. Record the affected area rather than only saying “worn.”
- Chalking or colour change
- A surface appearance change caused by exposure, cleaning or wear. It is recorded, but it does not by itself prove structural damage.
- Exposed reinforcement
- Glass fibre visible above or through the resin-rich surface. Its extent, location and any cracking or moisture contact belong in the finding.
- Nosing
- The finished front-edge construction. Inspect its grit, profile, bond line, mechanical fixing and projection as one edge detail.
- Nosing lift
- A raised, loose or peeling front-edge condition where the nose no longer stays seated on its base.
- Delamination
- Separation within a laminate or between layers of a covered assembly. It requires technical assessment rather than cosmetic treatment.
- Structural finding
- A crack, broken bar, deformation, unsupported bearing or movement that may affect load path. It is not converted into a surface-maintenance action by cleaning.
Action triage
When a Stair Tread Finding Is Ready to Act On
The record needs location, condition, extent, photo evidence and an assigned response.
Specify this if…
- The tread identity and original configuration are known.
- The finding is described by location, type, extent and effect.
- Photos distinguish the complete flight, the tread and the close detail.
- A responsible person assigns cleaning, monitoring, repair or replacement.
- Safety restrictions and reopening criteria are recorded when needed.
Look elsewhere if…
- The report contains only “surface worn” or “looks bad.”
- A loose nosing is treated as a cosmetic colour problem.
- A bar crack or delamination is painted, patched or ignored as a stain.
- The photograph has no stair, level, tread mark, date or scale.
- The inspection interval or action owner is left undefined.
Finding map
What Each Stair Tread Condition Means
Start with the location of the finding, then separate cosmetic, edge, fixing and structural effects.
Swipe horizontally to view all columns.
| Finding | What to record | Initial decision direction |
|---|---|---|
| Dirt or contamination | Substance, extent, cleaning attempt and effect on texture | Clean and re-inspect; do not call it wear before the surface is visible |
| Colour change / chalking | Area, appearance, surface loss and any exposed fibre | Monitor, sample or assess the resin surface; appearance alone is not failure |
| Grit wear | Location, affected area, loss or polish and walking-line pattern | Compare with baseline and decide whether the surface remains fit for the duty |
| Nosing lift | Gap length, height, movement, attachment and edge condition | Stop local traffic if unsafe; review repair or replacement of the edge |
| Loose fixing | Missing, loose, deformed, corroded or inaccessible hardware | Restore the approved fixing method; check support before retightening |
| Rocking tread | Contact points, movement and support condition | Review bearing and support; a tighter clip is not an automatic repair |
| Bar or panel crack | Position, length, branch pattern and movement | Restrict or stop use and require structural assessment |
| Delamination / broken section | Layer separation, exposed material, moisture and remaining section | Stop and assess replacement or engineered repair |
Inspection ledger
Fiberglass Stair Tread Condition Record
These fields make the next inspection or replacement comparable with the first.
Request a Project Quote| Specification | Value |
|---|---|
| Asset | Stair, level and tread mark Use the installed piece identity. |
| Product record | Construction, surface and nose Attach drawing, order or baseline photo if available. |
| Inspection date | Date, time and weather or service state Record cleaning or process activity that could affect the finding. |
| Finding type | Contamination, surface, nose, fixing or structure Use separate categories rather than one general condition score. |
| Extent | Area or length with a scale Photograph the same location and direction where possible. |
| Exposure | Wet, oily, chemical, UV or abrasion condition Record the condition at inspection and during service. |
| Likely cause | Contamination, cleaning, traffic, drainage or fixing State what should be investigated before the same finding repeats. |
| Action | Clean, monitor, repair, replace or stop Name the owner and completion criterion. |
| Review | Next inspection or acceptance point Set it from the risk and project procedure, not a copied universal interval. |
A Photograph Is Not Yet an Inspection
A close-up can show grit, a stain or a lifted nose. It does not show which tread it is, whether the condition repeats through the flight, whether the support is moving or whether the dark line is dirt or exposed material. The inspection becomes actionable when it connects location, condition, extent and decision.
This page focuses on the tread surface and front edge. General FRP maintenance, cleaning chemistry and structural repair boundaries remain on the FRP grating maintenance guide.

In this guide
- Establish a baseline before inspection
- Inspect the walking surface
- Inspect the nosing and fixings
- Check access, underside and supports
- Separate surface from structure
- Use a three-level photo record
- Assign the action and next review
Establish a Baseline Before Inspection
The most useful baseline includes:
- stair, level, tread mark and installation date;
- product construction, surface, colour and nose type;
- drawing or order revision;
- fixing type and location;
- as-installed photos from an agreed direction;
- the finished cover height or tread level where relevant;
- any known exposure, cleaning agent or incident.
Without the product identity, “replace with the same surface” is not a complete instruction. The tread may be molded or pultruded, open or covered, gritted or patterned, and the nose may be integral, returned or applied.
The mixed stair quotation list and installation-height guide provide the piece and baseline records that later inspection depends on.
Inspect the Walking Surface
Clean before deciding what is worn
Loose debris, oil, mud, salt, chemical residue and cleaning product can alter appearance and conceal the surface. Clean a representative area using the product-compatible method, dry it and inspect in the same light. Record what contamination was present and whether cleaning changed the finding.
Grit wear
Look for areas where the grit is:
- polished or flattened;
- missing in patches;
- detached at an edge;
- obscured by contamination;
- concentrated along a walking line or at the first and last steps.
Record the affected area and position, not only the word “worn.” A visual assessment can establish location and appearance; a required slip result needs the actual test method and acceptance condition.
For the production-side distinction between grit coverage, adhesion and a slip test, use the gritted FRP grating surface acceptance guide.

Chalking, fading and exposed fibre
Chalking and colour change are surface observations. They may indicate exposure or cleaning effects, but appearance alone neither proves nor disproves structural capacity. Check whether the surface also shows exposed reinforcement, cracking, softness or delamination.
Do not apply paint or a generic coating and call the tread restored. A compatible cosmetic finish, grip repair and structural repair are different scopes.
Inspect the Nosing and Fixings
The front edge receives direct foot contact, so inspect it as a continuous detail:
- grit coverage across the nosing band;
- colour contrast against the walking surface;
- bond line, return or profile seating;
- raised corners, gaps or movement;
- cracks, chips or exposed material;
- mechanical fixings, washers and hole condition;
- support beneath the front-edge construction.
Use the nosing and end-detail guide to distinguish the front edge from the two structural end supports. A nosing that remains visually present can still be loose at its attachment.
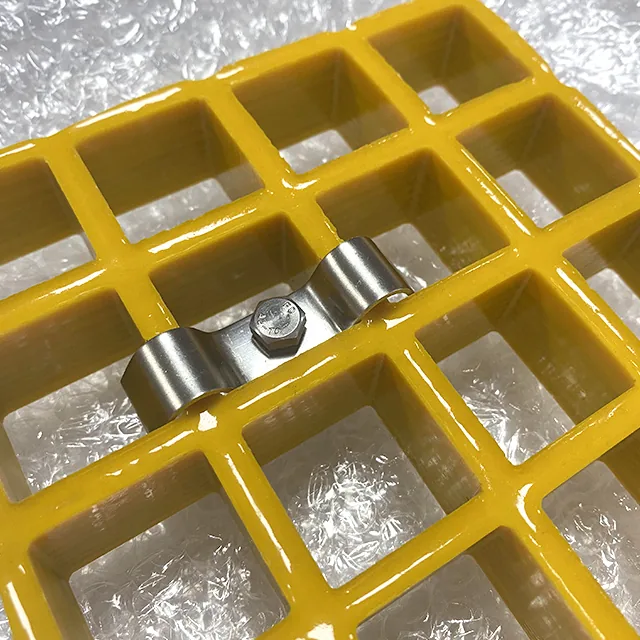
Loose tread or fixing
Check each fixing and support:
- is the tread restrained at both ends?
- does it rock under hand pressure?
- is a clip seated on the intended bar and support?
- is the washer, bolt or connector missing, loose or corroded?
- is the support face sound and in contact?
- did the movement start after cleaning, impact or a changed load?
Tightening a loose fixing is not the first action. First establish why it moved. A clip can loosen because it was not seated, the support changed or the tread was loaded outside the approved arrangement.
Check Access, Underside and Supports
Inspect from below where access is safe and approved. The visible walking surface can hide a missing support, a loose carrier, a crack near a bar or fastener, or water entering a cut edge. Do not lean over an open stair or remove structural components merely to obtain a photograph.
The underside check should record:
- contact and bearing at both tread ends;
- the condition of the carrier, stringer or substrate below;
- cracks, delamination, exposed reinforcement or movement;
- moisture, staining or debris trapped under the tread or cover;
- the rear side of fasteners, washers and holes;
- any temporary packing, shim or repair material not shown on the drawing.
Where it is safe and appropriate for the product, a gentle tap with a knuckle or a soft-faced tool can provide an initial screening comparison against another area of the same construction. A dull, hollow or changing sound should be marked for closer assessment. The tap is not a test result: it must not be used alone to prove delamination, and a normal sound does not prove the tread is sound.
If underside access is unavailable, state that limitation in the record. Do not describe the tread as fully inspected when only its top surface has been seen.
Separate Surface From Structure
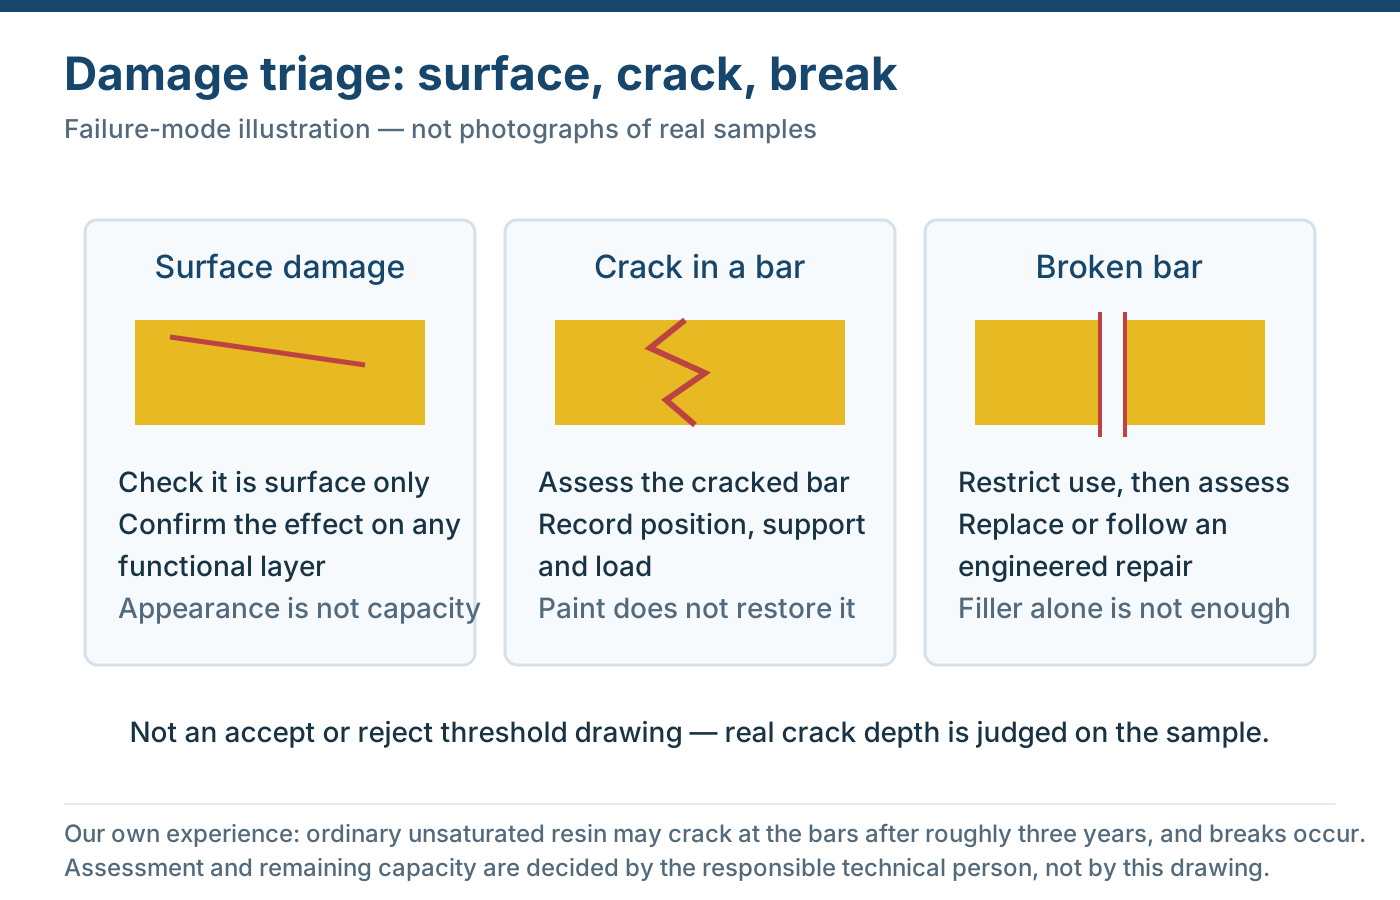
The FRP maintenance guide uses a triage between surface observations and structural findings. Apply the same separation here:
| Observation | Primary meaning | Immediate direction |
|---|---|---|
| Dirt, oil or salt | Grip and appearance may be affected | Clean and re-inspect |
| Colour change or chalking | A surface condition | Record and monitor |
| Grit polish or loss | Local walking-surface wear | Compare with baseline and inspect further |
| Exposed fibre with resin loss | Surface laminate may be affected | Restrict if necessary and assess |
| Lifted nosing | Front-edge attachment or local base issue | Secure the area and review repair |
| Loose fixing | Restraint defect | Check support and approved fixing |
| Rocking tread | Support or connection issue | Stop local use and review bearing |
| Crack in a bar or panel | Possible structural damage | Restrict or stop use and assess |
| Delamination or broken section | Structural finding | Replace or repair under an engineered method |
This table is a direction, not a remote structural approval. The responsible engineer or maintenance authority confirms the decision for the actual installation.
Use a Three-Level Photo Record
Take:
- Flight context: the stair, surrounding access and the general position of affected treads;
- Full tread: the complete cover or tread with its piece mark and adjacent supports;
- Close detail: the finding with a scale and clear lighting direction.
Keep the camera position and direction consistent between inspections where possible. A close-up of grit wear has little value if the next report shows a different tread, angle and lighting.
Record whether the photo was taken before or after cleaning. Both can be useful, but they answer different questions.
Assign the Action and Next Review
Clean and monitor
Use when the finding is primarily contamination, light surface change or a condition that does not affect the edge, fixing or structure. The record should state what was cleaned, the method, the result and when it will be checked again.
Review or replace a component
A worn or lifted nose, damaged edge or loose fixing may be handled by an approved local repair or component replacement when the base and support remain suitable. Do not replace a nose when the underlying tread or support is failed.
Treat grit renewal as a product-specific repair
A worn grit surface is not restored by painting it with a generic coating. An approved local renewal may be possible for some products, but the repair has to identify the compatible resin, surface preparation, grit, coverage, cure and acceptance sample.
The repaired surface may not match the original manufacturing process or its evidence. If the project depends on a recorded slip result, finish, warranty or consistent appearance across the flight, compare the repair with a replacement tread or cover before authorizing it. Extensive grit loss, repeated detachment, nosing deformation, cracking or delamination points toward replacing the affected product rather than recoating it.
Restrict or stop use
A cracked bar, delamination, broken section, unstable support or movement that may affect the load path requires the appropriate safety action. Restrict access or stop use as the responsible site procedure requires while the condition is assessed.
Record the likely cause before closing the finding
A repair or cleaning action should also record what probably caused the condition: abrasive traffic, a cleaning method that removed the grit, poor drainage, contamination, a loose fixing, over-tightening, damaged support or a changed operating load. If the cause is uncertain, mark it as open.
This prevents the replacement of a worn nosing when the real problem is a moving support, and prevents repeated coating repairs when the surface is being cleaned abrasively. The cause does not have to be proven before an immediate safety action, but it must be carried into the next review.
No universal inspection interval applies to every stair. Set frequency from traffic, environment, cleaning, consequences, history and the project’s maintenance procedure.
Common Inspection Errors
- Calling dirt “worn grit”: clean and inspect the surface first.
- Judging a nosing from colour: check seating, attachment and support.
- Retightening without diagnosis: movement may come from the support or bar.
- Treating fading as structural failure: surface appearance and load path are separate.
- Repainting a gritted surface: colour restoration is not a grip repair.
- Inspecting only from above: underside support, fastening and hidden damage are missed.
- Using tap testing as a verdict: a sound change is a screening clue, not a structural conclusion.
- Photographing only a close-up: location and tread identity disappear.
- Reporting no scale: a small stain and a long crack can look similar.
- Mixing findings in one sentence: cleaning, nose repair and structural replacement cannot share one action.
- Leaving the next review blank: a finding without follow-up is not a controlled record.
What to Send for a Condition Review
Send:
- stair, level and tread mark;
- product construction and original surface;
- installation or purchase record where available;
- inspection date and service conditions;
- finding category and measured extent;
- likely cause and any recurrence pattern;
- overall, tread and close-up photos;
- underside-access limitation, where relevant;
- current traffic restriction;
- proposed action and time available;
- current drawing and revision.
If the goal is a replacement tread, include the stair tread measurement record and the nosing and end-detail drawing. If the goal is a cover, include the existing substrate survey.
Final Inspection Check
Before closing the finding, confirm:
- the tread and location are uniquely identified;
- contamination has been separated from wear;
- grit, nosing, fixing and structure each have a finding;
- safe underside access and support have been checked or the limitation recorded;
- the affected extent has a reference and representative photos;
- the likely cause or recurrence pattern is recorded;
- the immediate safety action is recorded;
- the repair or replacement scope matches the actual failure;
- the responsible owner and acceptance point are named;
- the next review or replacement record follows the same piece identity.
That produces a maintenance record someone can act on, not simply a photograph of a surface that “looks worn.”
Evidence rules
What a Useful Tread Inspection Must Preserve
The record should explain what was seen and what happened next.
- Identify the exact tread — Record the stair, level and piece mark so the finding can be compared with the installed drawing and repeated inspection.
- Clean before calling it wear — Remove contamination with a compatible method and photograph the cleaned condition. Dirt can imitate grit loss and a changed surface.
- Separate surface from structure — Grit polish, colour change, nosing lift, fixing movement and bar damage lead to different actions and should not be combined into one score.
- Keep photo scale and direction — Use a flight view, full tread and close-up with a scale. Repeating the same camera direction makes later comparison meaningful.
- Assign the action and owner — State clean, monitor, repair, replace or stop, who is responsible and what condition permits the next review or return to service.
- Record the likely cause — Link a repeated wear, movement or moisture finding to traffic, cleaning, drainage, fixing or support so the next response addresses the source.
Send the finding
Send the Tread Identity and Condition Evidence
Include the installed location, product record, photos and current action.
- Molded and pultruded grating produced in house
- Full panels or factory cut-to-size pieces
- No fixed minimum order quantity
Fiberglass Stair Tread Inspection FAQs
How do I tell dirt from worn grit on a fiberglass stair tread?
Does colour change mean the fiberglass tread has failed?
What should I photograph on a damaged stair tread?
Should the underside of a fiberglass stair tread be inspected?
Can tapping confirm delamination in a fiberglass tread?
Is a loose nosing always a structural tread failure?
Can worn grit be recoated on site?
When should a tread be replaced rather than cleaned?
How often should fiberglass stair treads be inspected?
What should be included in an inspection report?
This content was prepared and reviewed by Dengtai Industry’s technical and production team using the project conditions, available product data and applicable documents. Limits that require design, testing or approval are identified in the content. Content last checked: