Accessibility and grating selection
ADA Compliant FRP Grating: What Is & How to Choose
For an accessible walking surface, the key question is not whether a panel is called mini mesh. Measure the clear opening at the walking plane, place elongated openings perpendicular to travel, and review joints, cuts, stairs and transitions as part of the installed route.
Prepared by
Dengtai Industry
Published
·
Reviewed

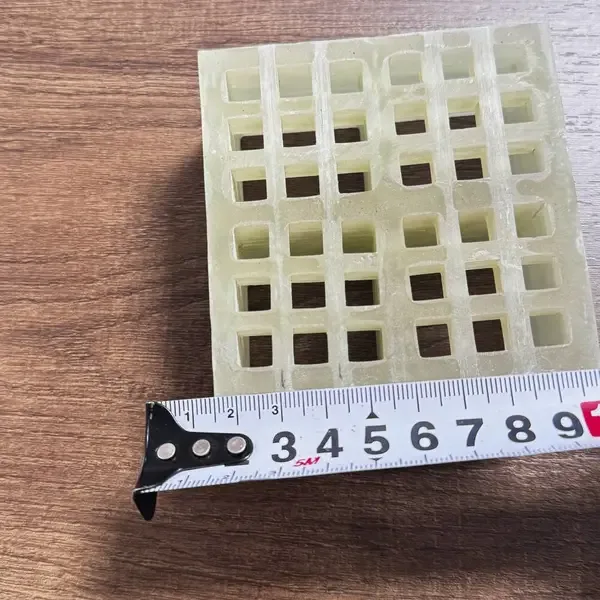
A small upper mesh can be a starting point, but the measured clear opening controls. Photo: Dengtai Industry.
Key definitions
What ADA Compliant FRP Grating Actually Means
The opening, travel direction and installed route have to be separated from the product family name.
- ADA-compliant grating
- A grating surface evaluated against the applicable accessibility requirements for an accessible route. It is not a separate material grade, and a supplier product name does not establish compliance.
- Clear opening or net opening
- The unobstructed distance between adjacent bar edges at the walking plane. This is the value to check against the 1/2 inch (13 mm) sphere requirement, not the catalog mesh name.
- Mesh pitch
- The centre-to-centre distance between adjacent bars. Product names such as 19 × 19 mm commonly describe pitch, so the clear opening is smaller and must be calculated or measured.
- Elongated opening
- A slot or rectangular opening whose length is greater than its width. ADA requires its long dimension to be perpendicular to the dominant direction of travel, subject to the code’s applicable exceptions.
- Dominant direction of travel
- The main direction in which pedestrians and mobility devices move across the surface. It should be marked on the layout drawing because it determines the required orientation of elongated openings.
- Installed accessible route
- The complete walking path, including panel joints, cut edges, frames, covers, changes in level, stairs and other interfaces. A compliant opening alone does not establish that the route is compliant.
Visual check
Check the Opening Before Choosing the Mesh
The sequence follows the physical surface a user meets: measure the opening, orient it to travel, then inspect every installed interface.
Start at the walking plane
Check the finished clear gap where feet, tyres and mobility-device casters meet the surface. A catalog mesh label or a drawing pitch is not a measured opening.
Mark the route before orientation
Put the dominant travel arrow on the approved layout. Elongated openings then have one reviewable orientation instead of being inferred on site.
Check the interfaces as well as the mesh
Panel joints, frames, cut-outs and removable pieces can create a larger gap than the centre of the panel.
Keep structure in its own review
Opening geometry does not confirm load, deflection, support, fixing or the complete accessible route.
Requirement matrix
ADA Grating Requirements and Manufacturer Checks
What the accessibility rule asks for, and what our drawing and product data can actually confirm.
Swipe horizontally to view all columns.
| Requirement | What ADA checks | What we can confirm from the grating order |
|---|---|---|
| Walking-surface openings | A sphere no larger than 1/2 inch (13 mm) diameter must not pass through an opening, except where a listed ADA exception applies. | Measured top-plane clear opening, panel geometry and whether joints or cut edges create a larger gap. |
| Elongated opening direction | The long dimension must be perpendicular to the dominant direction of travel. | Panel orientation, mesh direction, cut direction and an arrow marked on the approved layout. |
| Joints, frames and covers | Interfaces must not create an opening larger than the accessible-route requirement. | Finished panel sizes, joint detail, frame bearing, removable pieces and edge treatment included in the order. |
| Surface and level changes | Walking surfaces must be stable, firm and slip resistant. Vertical changes up to 1/4 inch can be untreated; 1/4 to 1/2 inch must be bevelled no steeper than 1:2; larger changes need a ramp or other compliant transition. | Panel surface and any agreed test evidence; surrounding falls, framing, transitions and level changes remain with the installed-route design. |
| Structural capacity | ADA opening geometry does not set the platform’s structural design load or deflection limit. | Load, span and deflection are reviewed separately for the proposed panel, support and fixing arrangement. |
Factory geometry
Mini Mesh Dimensions to Check Against the ADA Opening Limit
Nominal arithmetic from our published pitch and bar width, subject to finished-product measurement and tolerances.
Swipe horizontally to view all columns.
| Upper mesh pitch | Thickness options | Bar width | Nominal clear opening | ADA review note |
|---|---|---|---|---|
| 11 × 11 mm | 30 mm | 8.0 mm | Approx. 3.0 mm | Smallest upper mesh in our published mini mesh range. Measure the actual finished product and plane. |
| 19 × 19 mm | 25 / 38 / 60 mm | 6.5 mm | Approx. 12.5 mm | Common candidate, but the 1/2 inch check must be measured at the top plane and across every joint or cut. |
| 20 × 20 mm | 14 / 22 / 30 / 38 mm | 7.0 mm | Approx. 13.0 mm | Cannot be assumed ADA compliant from the mesh name; the nominal result sits at the stated 13 mm metric limit. |
Format comparison
FRP, Steel, Aluminum and Covered Grating Compared
Closing the mesh can help, but material, structural depth, joints and drainage remain part of the decision.
Swipe horizontally to view all columns.
| Surface format | Opening control | Drainage and cleaning | Best fit |
|---|---|---|---|
| Standard open grating | Usually much larger than a 1/2 inch opening | High open area and free drainage | Industrial access where accessible-route opening limits do not apply |
| Mini mesh grating | Finer upper mesh; actual clear opening must be measured | Still open, but finer debris can collect and cleaning needs review | Accessible walkways, platforms, covers and pedestrian interfaces where drainage still matters |
| Fine mesh or covered FRP grating | Smaller opening or closed surface, but joints and frames still need checking | Covered versions need a defined drainage path | Areas needing smaller dropped-object paths or a more continuous surface |
| Close-mesh steel bar grating | Close bearing bars can hold a small clear opening; verify the actual product, not only the series name | Open surface drains freely; coating damage and corrosion need maintenance | High impact, heat or a shallow structural depth where steel and coating maintenance suit the project |
| Aluminum punched plank or proprietary panel | Opening size and pattern vary by product; check both directions and the installed edges | Solid or punched patterns change drainage and debris behaviour | Lightweight pedestrian, drainage and architectural work where that specific system is approved |
| Standard solid plate | No mesh opening, but perimeter gaps and joints remain | Closed unless the layout includes drainage or removable access | Areas where water passage through the walking surface is not required |
Selection boundary
When Mini Mesh FRP Grating Is the Right ADA Candidate
Start where an accessible route needs an open, supported walking surface.
Specify this if…
- The location is on an accessible route or the project specification explicitly invokes ADA.
- The drawing states the maximum permitted clear opening and how it will be checked.
- The dominant direction of travel is known and will be marked on the layout.
- A mini mesh or covered FRP format fits the drainage, cleaning, load and fixing requirements.
Look elsewhere if…
- “ADA compliant” is requested without an opening value, drawing or installed-route scope.
- The layout has uncontrolled joints, frame gaps, penetrations or transitions that have not been reviewed.
- A standard 38 × 38 mm or 40 × 40 mm mesh is being used on the accessible walking surface without an exception.
- The project assumes a compliant opening also proves the structural load, deflection, ramp, handrail or guarding requirements.
Application check
The Same Grating Product Has Different ADA Risks by Application
Location changes the framing, removal, drainage and transition details that must be reviewed with the panel.
Public accessible walkway or platform
Review the opening in every direction where flow changes, then check panel joints, support fixings, slip surface and the transition to surrounding paving.
Opening + route + structure
Trench, drainage or access cover
A flush frame and removable cover introduce gaps that are not visible in the panel table. Confirm bearing, lift points, locking and surrounding level change.
Frame + gap + removal
Stair treads and nosings
Check the tread opening, long-slot orientation, nosing edge, fixing and the transition at both the riser and landing.
Tread + nosing + landing
Tree grates and pedestrian surrounds
Radial frames, tree openings and service cut-outs may create wider gaps near the accessible route; resolve the walking portion separately from the tree opening.
Tree opening + walking band
Pool, dock and waterfront walkway
Wet barefoot traffic changes the surface and cleaning requirement. Confirm corrosion resistance, drainage, level transitions and fixing without treating them as proof of ADA compliance.
Wet route + barefoot use
Industrial platform or maintenance access
Establish whether the area is a public accessible route, a staff-only service area or a mixed route before applying the opening criterion to the whole platform.
Define the route first
Small-Opening Grating: Checking Project Accessibility Requirements
“ADA compliant grating openings” is not a product grade. It is an installed-route condition that has to be evaluated at three levels: the applicable requirement, the finished opening of the supplied grating system, and the evidence that the installed surface was checked. This opening-checklist section gathers those decisions in one place before the later format comparison and quotation guidance.
The Opening Check
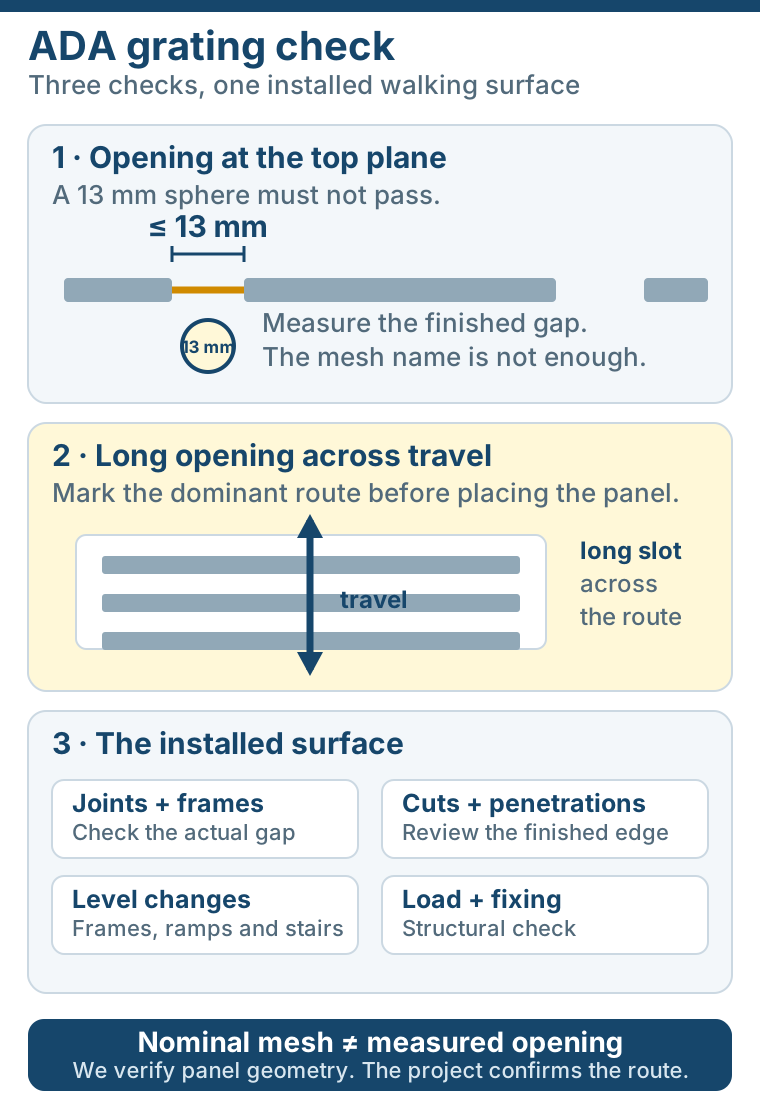
For an accessible route governed by the 2010 ADA Standards, section 302.3 requires that a sphere larger than 1/2 inch (13 mm) diameter not pass through an opening in the floor or ground surface, subject to the standard’s listed exceptions. Elongated openings must have their long dimension perpendicular to the dominant direction of travel.
The check is made at the finished walking plane and in both opening directions unless the applicable route-specific exception clearly changes the requirement. Panel pitch is not the clear opening. Our published 19 × 19 mm upper pitch with a 6.5 mm bar width produces an approximate 12.5 mm nominal gap, but the finished molded sample, tolerances, joints and cuts still need measurement.
The Route Check
The complete route must also be stable, firm and slip resistant. The U.S. Access Board floor and ground surface guide explains that the ADA does not prescribe one universal coefficient-of-friction result. When a wet, oily or food-processing surface needs numerical evidence, the project has to name the test method and acceptance value rather than relying on a grit label.
Joints, frames, removable covers, service cut-outs and changes in level can create a condition that is worse than the centre of the panel. A change up to 1/4 inch (6 mm) can be vertical; a change between 1/4 inch and 1/2 inch must be bevelled no steeper than 1:2; larger changes require a ramp or other compliant transition. These interfaces belong in the same route drawing.
Where there is no dominant travel direction, the Access Board guidance calls for openings no larger than 1/2 inch in both dimensions. Where the accessible route can completely bypass an opening area, the elongated-opening direction rule need not govern the bypassed area. Those exceptions remain project decisions; they do not make a similar-looking panel automatically compliant everywhere.
The Evidence Check
The evidence should identify the measuring plane, the two bars that define the gap, both dimensions, the travel direction, the checked joints and cuts, the product row and the drawing revision. A photograph can show the method; it does not replace the measured record. A 15 mm ball result is also not interchangeable with the smaller 13 mm sphere check.
The U.S. Access Board Chapter 3 provides the primary opening and surface requirements. The seven-step checklist below expands this summary into project inputs, installed interfaces and quotation evidence so the same condition can be reviewed by the designer, factory and site team.
Choosing the Right Grating Format
Why FRP Grating Is Used on Accessible Routes
The ADA does not prescribe fiberglass, steel, aluminium or another material. It sets requirements for the walking surface. FRP becomes relevant when the open grating needs to combine a small upper opening with corrosion resistance, drainage, light weight or lower handling weight.
Those advantages are conditional. FRP is generally less stiff than steel, so support spacing, span and deflection may control the design even when the opening geometry is suitable. The panel also needs to be safe under the actual foot, wheelchair, trolley or maintenance load. A steel close-mesh grate can be the better answer where impact, heat or a short structural depth governs.
For a wet coastal, wastewater or chemical exposure, compare FRP and steel on the same route, load, support, surface, fixing and maintenance requirements. Accessibility is one requirement on that list, not a reason to skip the others.
How we compare the realistic alternatives
There is no responsible answer that says FRP is always the ADA material. A close-mesh steel grate may be the stronger choice where the available structural depth is shallow, the design is dominated by impact or heat, or the project has a tested steel close-mesh assembly and a credible coating-maintenance programme. Its open area drains well, but cut edges, welds, coatings and corrosion have to remain acceptable for the life of the installation.
FRP earns its place where corrosion resistance, lower handling weight and electrical non-conductivity are real project requirements. It can also reduce maintenance where steel would need repeated recoating. The trade-off is stiffness and damage tolerance: FRP is not a direct drop-in equivalent to steel at the same depth, and the support span and deflection limit must be checked for the proposed panel. A small opening does not fix an inadequate structural section.
Aluminum punched plank or a proprietary pedestrian grate can provide a flush top and a controlled pattern, but the pattern must be checked as installed. A diagonal or “heel-friendly” graphic is not a universal opening dimension. The same applies to covers: a solid-top FRP cover removes the walking-plane mesh opening, but perimeter gaps, lifting hardware, drainage and the interface with paving still need design.
The cleanest specification compares the same duty across formats:
| Decision | What our review asks |
|---|---|
| Route and exposure | Is this a public accessible route, a maintenance area or a mixed route? Wet, chemical, coastal, food or high-impact? |
| Geometry | What clear opening applies, in which directions, at which walking plane? |
| Structure | What are the clear span, support bearing, load case and deflection limit? |
| Surface | Is the priority barefoot comfort, wet slip resistance, wheel traffic, drainage or easy cleaning? |
| Installation | Are joints, frames, cuts, fixings and transitions included in the same review? |
| Evidence | Is a sample, dimensional record, material certificate or test report required for this exact configuration? |
That comparison is more useful than a single material ranking because the lowest-price panel can become the most expensive choice when it needs more supports, a different frame, extra cutting or a replacement after corrosion or impact damage.
What Can Still Fail After the Panel Is Selected
The opening in the middle of a panel is only one part of the walking surface. The installed route can fail for reasons that do not appear on a mesh table:
- Panel joints: a gap between adjacent pieces can be larger than the opening inside each panel.
- Frames and perimeter gaps: a removable cover or trench grate may meet the mesh check but sit away from its frame.
- Cuts around services: pipe penetrations, columns and valve openings interrupt bars and can create uncontrolled gaps.
- Changes in orientation: rotating a rectangular mesh can change whether the long opening runs with or across travel.
- Fixings and movement: an inadequately restrained panel can lift, slide or develop an uneven joint; movement allowances must not become uncontrolled walking-plane gaps.
- Deflection and edge support: a panel that is undersized for the span can feel unstable or change shape under load even when its unloaded mesh passes a dimensional check.
- Level changes: the surrounding paving, threshold or frame must be reviewed under the applicable accessibility requirement.
- Stairs: tread surfaces follow the opening rule, while risers, nosing, handrails and stair geometry are separate requirements. The Access Board stairway guide provides that broader scope.

Panel joints deserve their own dimension. A drawing can show two adjacent panels at the correct opening while the accumulated tolerance, fixing clearance or frame setback produces a wider strip between them. On removable covers, the lifted panel can be reinstalled in the wrong direction. We therefore prefer a joint detail that constrains position and orientation, not a note that relies on the installer’s judgement after the delivery has left the factory.
The same principle applies to service cut-outs. A circular opening for a pipe or valve may remove several bars and create radial or triangular gaps larger than the upper mesh. A cover plate, half-pipe trim or additional framing may be required. The drawing should show the finished opening and how the remaining load path reaches the support; the cut itself is not a cosmetic detail.
For a trench cover, tree grate, stair tread or service platform, the factory drawing should show the finished pieces and the surrounding interface. The fabricator can check the supplied geometry; the project’s accessibility designer checks the complete route.
Keeping the Fine-Mesh Surface Usable
A smaller upper mesh can hold leaves, grit, fibers, food waste or cleaning residue closer to the walking plane. That does not change the nominal opening, but accumulated debris can affect drainage, appearance and traction. Include the cleaning method in the selection: brush, hose, pressure jet or mechanical cleaning each suits a different surface and resin.
Inspect panel joints and cut edges as well as the mesh. A loose panel, raised edge or displaced removable cover can create a hazard even when the original panel met the opening check. Record what was supplied, keep the approved drawing, and replace damaged pieces with a matching configuration.
A sensible inspection record has three levels. At handover, check the installed layout, opening, orientation, joints, frame level and fixings against the approved drawing. During routine maintenance, remove debris and check for movement, cracked bars, worn grit, damaged cut edges and missing clips. After a collision, heavy load, snow-clearing operation or service alteration, repeat the relevant checks before reopening the route. The frequency should follow traffic and contamination, with the first review being more frequent in a new installation or a site with heavy debris.
Repair needs a matching scope as well. Replacing only the visibly damaged square may leave a different mesh pitch or surface next to the original panel. Mixing a small upper mesh with a standard lower mesh can also change the local opening at the transition. Keep the original drawing revision and product identification so a replacement piece reproduces the walking surface rather than merely matching its colour.
Detailed Seven Checks for Small-Opening Grating
The following checks turn the summary above into a project record. They apply when a grating walking surface is being evaluated as part of an accessible route under the project’s applicable standard. They do not make every industrial grating opening subject to ADA, and they do not replace the authority’s interpretation of the adopted code.

1. Confirm That the Surface Is in Scope
Start with the location, not the mesh. Mark on the layout:
- whether the grating is on a required accessible route;
- whether people can bypass the opening instead of crossing it;
- where the route changes direction, turns or passes through a door or landing;
- whether the grating is a walkway, platform, stair tread, trench cover, tree grate or service access cover;
- which edition and clauses of the applicable code, standard or project specification have been adopted; and
- whether an exception or an alternative approval is being relied upon.
An industrial maintenance platform, a public entrance and a drainage cover can share a product shape while having different legal and project scopes. A panel called “mini mesh” cannot decide whether ADA applies. The design team must establish the route before the supplier can match an opening requirement.
For an ADA accessible route, the core opening rule in the 2010 ADA Standards is in section 302.3. A sphere larger than 1/2 inch (13 mm) diameter must not pass through an opening in the floor or ground surface, except in the specific locations listed by the standard. Elongated openings must be placed with the long dimension perpendicular to the dominant direction of travel.
Those are geometry requirements within a broader route. The surface also has to be stable, firm and slip resistant; changes in level and turns have separate requirements. The grating supplier can state a product’s opening and surface, but it cannot inspect or certify the complete building route from a panel drawing alone.
2. Translate the Requirement Into a Measuring Method
“Check the opening” becomes useful only when four fields are defined:
| Field | What the project should state | Why it matters |
|---|---|---|
| Measuring plane | Finished walking plane, top of bar, or another clearly drawn plane | Taper and surface build can change the gap through the panel |
| Directions | Both open directions or the route-specific slot direction | A sphere or wheel can pass through the controlling direction |
| Acceptance method | Caliper record, physical sphere/gauge, sample or agreed inspection | A dimension note and a functional check provide different evidence |
| Locations | Panel centre, joints, frame edges, cut-outs and removable pieces | The centre of a panel may not be the controlling opening |
The requirement should also say how many readings or sample locations are needed and what happens at a tolerance boundary. A drawing that says only “13 mm maximum” leaves the contractor to decide whether the dimension is measured across one square, between bar centres or at a joint.
Our review therefore prefers a photograph or marked drawing that identifies:
- the finished top plane;
- the two bars that define the measured gap;
- the measured value in both plan directions;
- the travel direction arrow;
- the corresponding joint or frame detail; and
- the product drawing revision and sample reference.
This is a documentation method, not a substitute for the project’s named test procedure. If the specification calls for a physical acceptance check, a caliper calculation alone does not close the requirement.
3. Check the Shape, Orientation and Route Together
A square opening is not automatically covered by the elongated-opening direction rule, and a long slot is not automatically acceptable because its narrow dimension is small.
Use this sequence:
- Measure the clear gap in both plan directions.
- Mark whether the opening is square, rectangular, diagonal or irregular.
- Draw the dominant direction of travel.
- For an elongated opening, place the long dimension perpendicular to that direction.
- Repeat at turns, intersections and entries where the dominant direction is not obvious.
- Where no direction truly dominates, use the more conservative two-direction check and confirm the applicable guidance.
The Access Board’s explanatory material shows grating slots as the example: the long dimension may be longer than 1/2 inch, but it is perpendicular to the dominant travel direction, while the controlling short dimension does not allow the 1/2 inch sphere to pass. A product table that lists only one gap dimension cannot prove that orientation.
A rectangular panel can also be rotated during cutting or installation. That is why the approved layout should mark the mesh direction and the dominant travel arrow. A box of correct-looking panels installed ninety degrees out can change the slot condition without changing the product SKU.
4. Audit Every Installed Interface
The panel opening is one candidate location in a route that can contain many interfaces:
- joints between panels;
- frame and ledge gaps;
- removable covers;
- tree or service openings;
- factory cuts around pipes and columns;
- edge trim and perimeter closure;
- transitions to other paving;
- expansion or movement joints; and
- small level changes at the grating boundary.
An installed route record should identify each interface, not merely state that the mesh is 19 × 19 mm. If a cover is removed for maintenance, the replacement orientation and seating should be repeatable. If a cut-out interrupts bars, the remaining edge and any closure should be shown on the drawing.
For a trench or access cover, the frame is particularly important because the hydraulic opening and the walking opening are not necessarily the same. For a tree grate, the tree opening and the walking band around it need separate treatment. For a platform with factory-cut pieces, each piece and opening should be identified against the approved layout.
5. Use the Correct Sphere and Ball Evidence
The 1/2 inch opening requirement is about a 13 mm sphere. A supplier may also mention a 15 mm ball test. Those are not interchangeable:
- a product that passes a 15 mm ball test may still allow a sphere between 13 mm and 15 mm to pass;
- a test result has to identify the specimen, measuring plane and method;
- a sample test does not prove a different joint or cut-out;
- a product test does not evaluate the full building route; and
- an ADA opening criterion is not the same as a structural load test.
If a quote uses a “15 mm ball” or “ADA” statement, ask what exactly was tested. Compare the nominal and measured values, the product row and the installed detail. Do not use a larger-ball result as a shortcut around the smaller-sphere criterion.
The mini mesh measurement guide explains how to separate upper pitch, bar width and the finished clear opening. The heel-proof grating review adds a footwear-shaped check, but that project-specific shoe test also does not replace the ADA sphere criterion.
6. Keep Accessibility, Surface and Structure in Separate Columns
Small-opening accessibility and structural suitability can be checked in the same meeting, but they should not be collapsed into one number.
| Requirement | What is being evaluated | Product evidence that may support it | What remains outside the panel |
|---|---|---|---|
| Opening geometry | Passage of the 13 mm sphere and orientation of elongated openings | Measured sample, finished-opening drawing, inspection record | Joint execution and complete route |
| Walking surface | Stable, firm, slip-resistant surface and level changes | Surface type, agreed test evidence where required | Slope, site finish, transitions and maintenance |
| Structural capacity | Load, support, span, deflection and fixing | Matched product row, calculation, load table or test | Building frame, supports and installation |
| Route circulation | Turns, clearances and continuity | Layout information supplied by the designer | Complete accessible-route design and approval |
| Durability and cleaning | Exposure, debris, drainage and maintenance | Resin, surface, geometry and cleaning guidance | Site cleaning programme and actual service environment |
A panel can pass the 13 mm arithmetic and fail the load case. It can pass a load table and still be installed across a joint larger than the opening inside the panel. It can be structurally sound and still sit at an unacceptable level change. The order needs all relevant columns visible.
7. Build an Evidence Package That Can Be Checked
For a small-opening project, the most useful quotation and submittal package includes:
- the applicable route and named code or standard;
- the product family and exact configuration;
- pitch and bar width for the upper and lower mesh;
- the nominal and measured clear opening at the stated plane;
- the panel, joint, frame and cut-out layout;
- the dominant direction of travel and orientation marks;
- the surface, resin and fixing scope;
- support, load and deflection data where structural suitability is required;
- any sample, sphere/gauge or test evidence and its specimen scope; and
- the boundary between factory scope, installer work and designer approval.
This package lets a reviewer find the exact place where a claim is supported or where an assumption remains open. It also gives the site team a baseline for receiving inspection and later replacement.
What Our Factory Can Confirm
We can confirm the product rows we offer, the upper and lower mesh dimensions stated for that row, the finished panel or cut dimensions in the approved drawing, available surface and resin options, edge treatment, fixing components in our scope and any dimensional or material record agreed for the order. Where a structural selection is required, we can review supplied support and load inputs against the applicable evidence for the proposed construction.
We cannot declare that an unbuilt route is ADA compliant, certify another contractor’s frame and site work, or state that a generic product name satisfies every local code. The project’s accessibility designer, installer and responsible authority remain responsible for the installed route and its final acceptance.
That division is not a limitation on service; it is what makes the product evidence usable. A measured panel can be checked. A named route can be inspected. A catalogue adjective cannot do either.
Turning the Drawing Into an Order
How We Turn a Drawing Into a Manufacturable Order
Our review starts with the accessible route, not with a mesh catalogue. We ask the buyer to identify the walking area and its project requirement, then mark the dominant travel direction and the support layout on the same drawing. From there we can separate the items our factory controls from items that remain with the designer, installer or authority:
- Panel geometry: upper-mesh pitch, bar width, thickness, panel size and the finished opening we can inspect.
- Fabrication: top face, cut profile, remaining bar edges, trim, joint arrangement and orientation marks.
- Surface: moulded top, grit or another agreed treatment, checked against the intended footwear, wheels and cleaning method.
- Fixing interface: clips or hold-down points shown on the layout, with any frame or support provided by others identified clearly.
- Evidence: drawing revision, dimensional record, material documents and any test report whose specimen and method match the offered item.
What we cannot convert into a generic ADA certificate is the performance of a complete route that we do not design or install. Slopes, handrails, guards, landing dimensions, structural approval, site workmanship and the authority’s interpretation remain with the responsible project team. That boundary is not a refusal to help; it prevents a panel drawing from being presented as approval for a system nobody has inspected.
When the job is prototype or sample-led, we can mark the upper face, package the panels by location and use the same orientation convention from the sample to the production drawing. That reduces the most common site error: a panel that is geometrically acceptable but installed the wrong way round.
How to Compare Two “ADA Grating” Quotations
The same three words can hide very different offers. A useful comparison puts the following fields side by side before looking at the headline price:
| Quotation item | Why it changes the result |
|---|---|
| Product and structure | Molded FRP, pultruded FRP, close-mesh steel, aluminium plank or a covered assembly have different depth, stiffness and corrosion behaviour. |
| Mesh pitch and bar width | These determine the nominal gap; “mini mesh” or “heel proof” alone does not. |
| Finished thickness and support span | The structural depth has to suit the load, deflection limit and existing supports. |
| Resin, surface and colour | Chemical resistance, UV exposure, slip treatment and cleaning are separate from opening geometry. |
| Panel sizes and cut-outs | More joints and service penetrations create more places where the installed opening can differ from the nominal mesh. |
| Clips, frames and edge trim | An incomplete fixing scope can turn an acceptable panel into a loose or uneven walking surface. |
| Drawing, sample and test evidence | These should identify the same configuration and state what is measured or tested. |
| Packing, freight and spare pieces | Replacements and site handling are part of the delivered system, especially for cut-to-size panels. |
If one quotation includes a tested close-mesh steel assembly and another offers a nominal FRP mesh with no dimensional record, the numbers are not describing the same evidence. Ask each supplier to state the clear opening, measuring plane, orientation, support assumption and document scope in writing. The FRP grating cost guide explains how thickness, resin, surface, cutting and quantity affect price; it does not turn estimates into a quotation.
What We Check as an FRP Grating Manufacturer
Before quoting an ADA-sensitive order, we ask for:
- the application and whether it is on an accessible route;
- the required opening value and the measuring plane;
- the dominant direction of travel;
- the panel, joint and cut layout;
- the structural load and deflection requirement;
- the surface, fixing and environment.
We also ask where the panel interfaces with a frame, stair, cover, tree opening or change in level. Those are not additional paperwork; they are the places where a compliant-looking panel becomes a site defect. If the drawing does not answer the question, we mark the assumption explicitly or leave it open for the project team rather than inventing a favourable dimension.
We can then confirm whether a mini mesh or other FRP panel is a suitable geometric candidate. We mark the mesh direction on the drawing, state the proposed configuration, and arrange a sample or measurement check where the project requires one. When the customer has an existing support grid, we compare the proposed panel with that grid before discussing an ADA-sensitive layout.
We do not convert a mesh name into a compliance certificate. A product can have a small opening and still be wrong for the route if the joints, direction, level change, support or load case does not work.
Review Basis and Limits
This guide is based on the U.S. Access Board’s 2010 ADA Standards guidance for openings and floor surfaces, together with the factory’s current published mini-mesh rows and quotation practice. It separates those sources so a dimensional calculation, a product test and a complete installed-route approval are not presented as the same evidence.
The page does not claim a generic mini-mesh load rating, a universal slip coefficient or compliance for a route that has not been inspected. A project-specific measured sample, approved drawing, gauge check or structural review should be added where the applicable requirement calls for it.
Selection path
How to Choose ADA Compliant FRP Grating
Five checks from the route and travel direction to the finished panel and support.
Confirm where the grating sits and whether ADA applies to that walking surface. An industrial service area and a public accessible route are different scopes.
Draw the main pedestrian travel direction on the layout, then orient elongated openings perpendicular to it.
State the 1/2 inch sphere check or an approved project criterion, the measuring plane, tolerances and any areas that need a sample check.
Check panel joints, perimeter gaps, cut-outs, removable covers, frames and changes in level, because the opening inside one panel is not the whole surface.
Confirm load, span, deflection, clips and support independently from the opening and orientation checks.
Project inputs
What to Send for an ADA Grating Review
Six fields that let the project team and factory review the same installed surface.
- Application and route — Public entrance, accessible walkway, platform, trench cover, tree grate or another location, with the applicable project clauses.
- Required opening — Maximum clear opening, measuring plane, acceptance method and whether a physical sphere or sample check is required.
- Travel direction — Dominant direction across the surface, including intersections, turns and maintenance access points.
- Panel and joints — Mesh pitch, bar width, panel size, joint arrangement and any tolerances affecting the finished opening.
- Cuts and transitions — Pipe openings, service penetrations, frames, removable sections and the interface with surrounding paving or structure.
- Load and environment — Support layout, load and deflection, cleaning, wet or chemical exposure, surface and fixing requirement.
Accessibility review
Send the Opening and Travel Direction
The requirement must be measured on the installed walking surface, not inferred from a catalog name.
- Send the required clear opening, not only “ADA compliant”
- Mark the dominant direction of travel on the drawing
- Show joints, frames and cut-outs that affect the surface
ADA Compliant Grating Questions
What makes FRP grating ADA compliant?
Is mini mesh FRP grating automatically ADA compliant?
Is a 20 × 20 mm mini mesh ADA compliant?
Does ADA compliance include grating load capacity?
Do joints between panels matter?
Does the half-inch rule apply in both directions?
Should I choose a 1/4 inch opening instead of 1/2 inch?
Is close-mesh steel ever better than FRP for an ADA route?
What should an ADA grating quotation state?
Do you certify the complete accessible route?
This content was prepared and reviewed by Dengtai Industry’s technical and production team using the project conditions, available product data and applicable documents. Limits that require design, testing or approval are identified in the content. Content last checked: